Let's not do this time's warp again...
I got cocky. The last project went so well I thought I remembered what I did. I did not.
And this warp is substantially longer and wider than that of the last project, so...

There were two pitfalls that caused this to be painful. One was an actual pitfall, the other was just imagined and then taken seriously. It's safe to say, however, that I've learned a lot from this warp.
The real pitfall is that I put the counting thread on the end of the warp without the cross. While the counting thread helped me count how many ends were in a color (with mostly success - two colors ended up having too many ends and one color was missing an end) the actual purposes of the counting thread is really to figure out how many ends are in an inch so the warp can be spread out appropriately. I know this. But I was worried about being able to keep track of both numbers at the same time so instead of counting inches I counted ends in each color. That might have worked out if each color was an inch wide. Alas...
So I ended up with a useless counting thread.
I also thought that I had chained the warp in the wrong direction to warp back to front. I started with the non-cross end and chained the warp towards the cross. This absolutely would have worked for me (though, it would have been easier if the counting thread had been on the cross end).
I felt like I needed to warp front to back because of the way I chained the warp. I haven't ever done that successfully. Tutorials online suggested I should start by sleying the reed. Since I knew I'd need to sley 2 ends per dent I was worried about the warp getting tangled between the reed and the heddles, so I started by threading the heddles. This allowed me to tie the threads in 1 inch bundles on the back end so I could spread them out in the raddle appropriately.
It would have been helpful to have kept the raddle on the back beam while beaming the warp. For some reason, I didn't think I should, so I removed it before beaming. The purpose of this blog is really so that I can maybe remember these horrific mistakes and prevent myself from doing them yet again! My husband is not an incredibly willing helper with the loom, but I knew I was going to have to monitor the warp separator paper while beaming on because I had two rolls that weren't going to overlap, but would be the right width for the warp. It was going to be a lot to pay attention to, so i asked for his help and he provided. It felt like that went well.
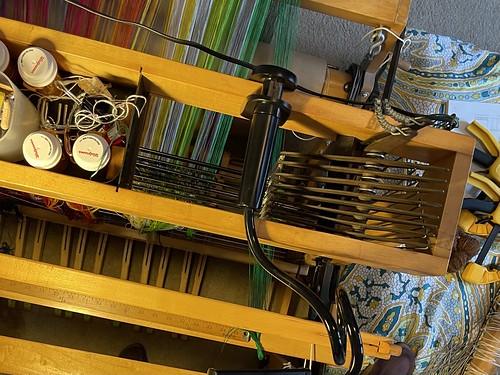
I sleyed the reed.
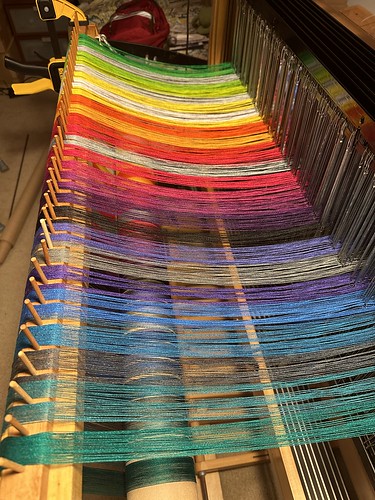
And realized that the ends in the reed were not in line with the ends on the back beam! In fact, the width of the warp on the back beam was 30" when I was sleying a reed for 36"! You can see in the picture below that the width of the green yarn in the reed will be wider than the width of the green yarn at the back beam…
In a panic I reached out to Reddit and a couple of guild members. It felt like there were probably some inconsistencies in the warp tension anyway, so I decided to re-beam the warp. Guild members made me think that 10/2 cotton could withstand being re-beamed (I never even realized that the material would make a difference, but duh).
So I pulled the warp forward and re-chained it in three sections. I then re-attached the raddle to the back beam and bribed my husband into helping me re-beam the warp. I could tell, however, that that there were parts of that warp that were going to have inconsistent tension but I thought I'd go ahead with it and just put weights on the offending warp threads.
I thought that was all but it was not. As I was tying on to the front beam, I realized that one side had significantly more tension than the other. Sooo...I pulled the warp back through the heddles and reed yet again and re-chained the warp for a third time.
Three times a lady? Third time's a charm? Let's hope!
When tying on this time, while the ends on the left of the warp seem longer after they've been tied on than the ones on the right, I'm attributing this to the fact that they were on the top of all the other threads on the warping mill. The tension is the same, so I'm off to finally tie up the treadles!
I learned a lot the hard way while doing this:
It doesn't feel like this 5 yard warp is particularly long, but it's definitely the widest warp I've put on the loom so far and I guess that does make a difference when warping the loom. This 10/2 cotton is also the thinnest yarn I've used to date, so there's a lot of room for learning things here!
I'm taking a lot of solace in the fact that at no point did I feel like I couldn't do this or that this whole process sucked or that I never wanted to do this again. I've been frustrated, to be sure, but not to the point of crying or thinking I couldn't do it.
I really am looking at this as a learning experience. The point of a gamp is to learn things anyway, right?
There were two pitfalls that caused this to be painful. One was an actual pitfall, the other was just imagined and then taken seriously. It's safe to say, however, that I've learned a lot from this warp.
The real pitfall is that I put the counting thread on the end of the warp without the cross. While the counting thread helped me count how many ends were in a color (with mostly success - two colors ended up having too many ends and one color was missing an end) the actual purposes of the counting thread is really to figure out how many ends are in an inch so the warp can be spread out appropriately. I know this. But I was worried about being able to keep track of both numbers at the same time so instead of counting inches I counted ends in each color. That might have worked out if each color was an inch wide. Alas...
So I ended up with a useless counting thread.
I also thought that I had chained the warp in the wrong direction to warp back to front. I started with the non-cross end and chained the warp towards the cross. This absolutely would have worked for me (though, it would have been easier if the counting thread had been on the cross end).
I felt like I needed to warp front to back because of the way I chained the warp. I haven't ever done that successfully. Tutorials online suggested I should start by sleying the reed. Since I knew I'd need to sley 2 ends per dent I was worried about the warp getting tangled between the reed and the heddles, so I started by threading the heddles. This allowed me to tie the threads in 1 inch bundles on the back end so I could spread them out in the raddle appropriately.
It would have been helpful to have kept the raddle on the back beam while beaming the warp. For some reason, I didn't think I should, so I removed it before beaming. The purpose of this blog is really so that I can maybe remember these horrific mistakes and prevent myself from doing them yet again! My husband is not an incredibly willing helper with the loom, but I knew I was going to have to monitor the warp separator paper while beaming on because I had two rolls that weren't going to overlap, but would be the right width for the warp. It was going to be a lot to pay attention to, so i asked for his help and he provided. It felt like that went well.
I sleyed the reed.
And realized that the ends in the reed were not in line with the ends on the back beam! In fact, the width of the warp on the back beam was 30" when I was sleying a reed for 36"! You can see in the picture below that the width of the green yarn in the reed will be wider than the width of the green yarn at the back beam…
In a panic I reached out to Reddit and a couple of guild members. It felt like there were probably some inconsistencies in the warp tension anyway, so I decided to re-beam the warp. Guild members made me think that 10/2 cotton could withstand being re-beamed (I never even realized that the material would make a difference, but duh).
So I pulled the warp forward and re-chained it in three sections. I then re-attached the raddle to the back beam and bribed my husband into helping me re-beam the warp. I could tell, however, that that there were parts of that warp that were going to have inconsistent tension but I thought I'd go ahead with it and just put weights on the offending warp threads.
I thought that was all but it was not. As I was tying on to the front beam, I realized that one side had significantly more tension than the other. Sooo...I pulled the warp back through the heddles and reed yet again and re-chained the warp for a third time.
Three times a lady? Third time's a charm? Let's hope!
When tying on this time, while the ends on the left of the warp seem longer after they've been tied on than the ones on the right, I'm attributing this to the fact that they were on the top of all the other threads on the warping mill. The tension is the same, so I'm off to finally tie up the treadles!
I learned a lot the hard way while doing this:
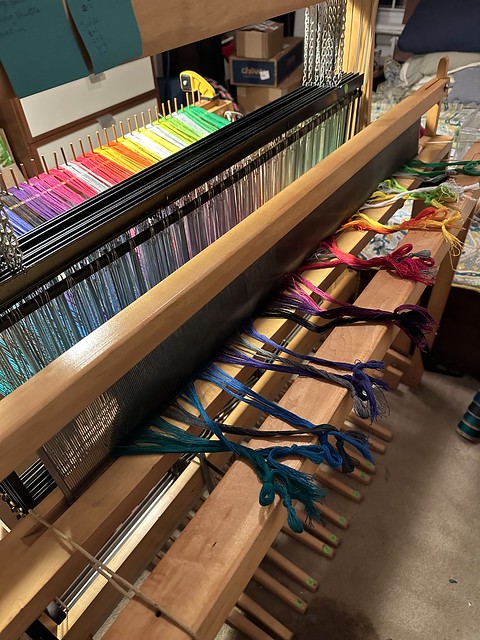
- If the warp is wide, it will likely be easier to handle and will have more consistent tension if its wound in 10" sections
- Tie the new color to the old color instead of starting and stopping colors on the warping mill
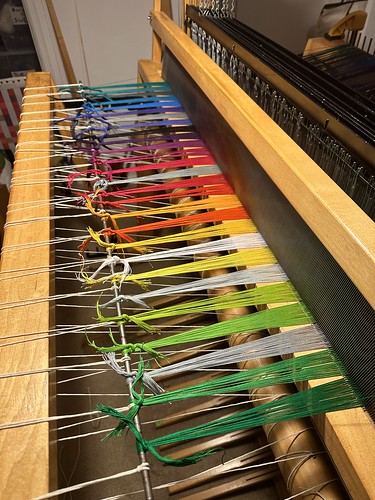
- Getting warp width right
- The counting thread counts 1" widths. This is important! ALWAYS do it based on 1" and not the colors or a repeat or anything else and ALWAYS do it by the cross!
- Keep the raddle in when beaming the warp if the reed hasn't been slayed.
- Sleying the reed at the beginning when warping front to back makes sure the warp is taking up the right amount of width. It's the raddle of the front beam.
- Just because the steps to warp a loom can be done in any order does not mean that they should be done in any order.
- If the weaving width is 36" the separation paper should probably be wider than that. I mis-managed this warp separator so badly, I thought i was going to get a roll of 4" wide (Rey has a 45" warp width) corrugated cardboard to prevent myself from running into this again. I realized, however, that I could just use pieces of paper the length of the width of the brown paper roll I had and cut it as wide as I need it to be. That seems to have done the trick here, and I was able to wind on without the aid of my husband the third time (which is good, because I was running out of bribes!).
It doesn't feel like this 5 yard warp is particularly long, but it's definitely the widest warp I've put on the loom so far and I guess that does make a difference when warping the loom. This 10/2 cotton is also the thinnest yarn I've used to date, so there's a lot of room for learning things here!
I'm taking a lot of solace in the fact that at no point did I feel like I couldn't do this or that this whole process sucked or that I never wanted to do this again. I've been frustrated, to be sure, but not to the point of crying or thinking I couldn't do it.
I really am looking at this as a learning experience. The point of a gamp is to learn things anyway, right?


Comments
Post a Comment